A Christmas surprise!
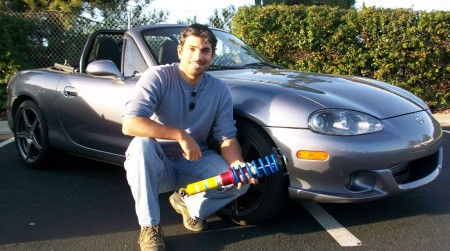
It was a wonderful present to visit with Travis and Deana in our Redwood City office just a couple days before Christmas!

As part of their West Coat vacation, Travis surprised Deana with a racer’s delight: a Skip Barber High Performance Driving and Racing Combo event held at Mazda Raceway Laguna Seca. Awesome! Deana mentioned being soaked while driving an open-cockpit Formula Mazda through rain and fog heading toward the iconic Corkscrew. It probably looked something like this, but with rain too!

It just so happened they’d recently sent their rear FCM Elite-tuned Bilstein dampers in for a few enhancements. Deana had a very successful 2016 SCCA Solo autocross season, doing exceptionally well in the ProSolo and Solo Nationals series including winning the 2016 SCCA National Championship in C Street Ladies class, earning her first ever National Championship jacket! A consummate competitor, she’s planning to run more Open class events next year. To keep at the top of their game, they wanted to make some setup improvement for the 2017 season to get even more speed from their Miata. Those include using a Karcepts front sway bar (with more adjustment range than the Progress bar they ran in 2016)*, adjusting bump stop length and stiffness, alignment tweaks, and some damping changes as well.
*NOTE: for an ND using stiffer springs via a coilover setup (or heaven forbid, lowering springs!) then the Progress bar is probably perfect. The factory ND front bar may also work but we would narrow down such details through our Elite Consultation to determine what an individual customer needs. For example, we’re doing a ‘Touring’ ND Elite suspension build for Colin and he’ll be using the Progress front bar.
Rewinding a bit for those who don’t know the story of our work with the Kelley’s on their ND Mazda Miata: all FCM Elite suspension build to start with a monotube Bilstein that fits the application. The good news is the factory 2016-2017 ‘Club’ package already comes with Bilsteins, but the bad news is that the Club Bilsteins were closed via a non-serviceable ‘crimp-top’ process, not the serviceable ‘take-apart’ process. The take-apart style is what the majority of aftermarket Bilstein HD, Sport, PSS, threaded body ASN, and similar dampers come with. Those are designed for easy access to rebuild and allow us to rapidly optimize damping for each customer’s needs. For production vehicle, manufacturers are very sensitive to cost so it makes sense why they might choose the ostensibly lower cost crimp-top style. If only Mazda told Bilstein to retain the take-apart feature on their dampers (as had been the case for the 1990 to 1997 ‘NA’ Miata and the 1999 to 2005 ‘NB’ Miata). But this becomes another story for a different post..!
Fortunately, we have experience modifying the crimp-top into a take-apart, with the acknowledgement that the modified shock body will be about 1/2″ shorter. Since the SCCA Street class rules allow +/- 1″ difference between original factory damper length, there’s no problem here. In fact, you get a little more room to use bump stops for suspension tuning so it’s actually a nice side benefit! As of December 2016, the sequence of ‘de-crimping / take-apart’ operations for (4) Club Bilsteins add $350 to the Elite Project price.
Practical considerations about ‘suspension modeling’, functional vs. theoretical, bump stops and ride frequencies matter!
Once they had sourced Bilstein dampers and we had prepared them for their Elite Project build, I’d also need to understand enough of the original design and behaviors before making any adjustments. To gather the needed data, we worked together at their house to apply our FCM Elite suspension characterization process, continually refined over the past 15 years (and definitely improved since I made this video in 2012).
It seems our combination of hands-on data gathering (such as examining directly the available suspension bump travel, bump stop compression characteristics, factory camber curves, factory shock damping curves, etc.) plus efficient (not overly complicated!) spreadsheet analysis is unique in the aftermarket industry. As an example, most aftermarket designers seem to avoid or not understand the importance of ride frequencies (which comes from proper spring rate choice) to create ‘Flat Ride’, how to properly utilize bump stops, or the pros and cons of sway bar size.The factory engineers know quite a lot so it’s a terrible conceit to dismiss their intentions without first understanding and articulating WHY it’s worth departing from their design choices.
As a contrast, for our Elite Project builds we absolutely consider the vital importance of bump stop interactions and camber curves when predicting vehicle behavior and making spring rate, alignment, and ride height recommendations. The playlist I created based on various measurements of the 2016 Mazda Miata is below:
I don’t see bump stops in suspension CAD models, partly because they’re linear-to-non-linear devices and not so easy to model! But when you’re driving, you can feel them working (and if the designer did a good job, they work very fluidly). I trust you can appreciate the fact that there is more going on than shows up in some mechanical engineer’s easy Formula SAE assignment. You drive a vehicle in the Real World, not a simulator.
It’s so critical to quantify the as-delivered suspension behaviors, even approximately, before you’re able to make improvements instead of just changes. These practical measurements are MORE useful than just putting together a fancy 3D solid model of the suspension. There are more components in play than just what shows up in a model of ONE corner of the vehicle! Roll centers and nuances of suspension geometry are worth considering, but not at the expense of Flat Ride tuning and effective use of bump stops to prevent a situation where, as one Miata tuner said, ‘that corner of the car stops working’.
With our Real World characterization process done, plus Deana’s competition driving feedback, and some seat time on my own to ‘grok’ how the numbers related to actual driving experience, I had better understanding of the ND Mazda Miata suspension. I could both feel (in my body) and visualize (via our suspension spreadsheet) what the car was doing in a high-performance environment, from corner entry / mid-corner / corner exit. I could see how small changes to packers or alignment could affect the handling. I really like being able to have this quantitative visualization process and hope I’m not alone. I couldn’t afford nor program an aerospace-grade model but I’m not sure it would be as adaptable in its code as my brain is when additional concepts easily integrated into my ‘mental suspension model.’
This is also why just carefully watching a vehicle in motion is so powerful, because you can get SO much information. Bob Davis showed me some slow motion video at Solo Nationals years ago and I think that kind of camera is a tremendously powerful investment! I like to get both my brain hemispheres working together, so it’s neither all theory nor all hands-on, but an integration of both: applied theory refined with feedback from Real World data and driving behaviors. There are very complicated ways of gathering data and there’s certainly value in much of it, but the scope is beyond what most racers have access to – and it’s also possible that over-emphasis on complex modeling replaces a K.I.S.S. (‘Keep It Simple, Silly!’) approach. I like to see our Elite customers be empowered to understand what their vehicles are doing and how they can make adjustments – where needed – on their own, in a common sense way, with tools like spreadsheets which are available to all.
With the measurements we took on the ND, it was easy to see the bump stops interactions front vs. rear, the influence of the different front and rear camber curves, the directly measured front and rear ‘bounce’ frequencies coming from the combination of overall system damping and installed spring rates (not just the ‘unloaded’ spring rate when sitting on a bench top!), front and rear sway bar stiffness. Of particular interest to me were the Club package shock damping results – these were good in the sense that the dampers were the first Miata dampers I’ve ever seen that NEVER jack down (i.e. the compression is always the same or higher than the rebound force, like a rally car)! So kudos there, Mazda! But I also saw that the gas force was needlessly high (over 60 lb at the shaft!) and that causes the vehicle to have a ‘skeetery’ behavior over marbled surfaces; the suspension is NOT tracking the surface well since the damper has to develop that much force before it is able to compress. It’s like a very SHARP ON/OFF switch and high nitrogen pressure* in a damper is NOT a recipe for maximizing grip. These are small but important details that go into the ultimate design and behavior of a vehicle that you can’t get from relying on 3D models.
*NOTE: I use graphs and videos to explain the influence of gas pressure later in this post
Together, the pros and cons gathered from these common sense characterization inputs helped me see what improvements would make for a faster and more forgiving autocross car that was still street friendly. As the Kelleys were going to be increasing the size of the front sway bar to reduce roll and on-throttle, I would have to play with bump stop rates and lengths both front and rear to keep the car in a neutral handling balance. It’s amazing how powerful bump stop tuning is!
For example, I was playing with an R54 Mini Cooper’s bump stops and in 10 minutes was able to turn it into a lift-throttle neutral (even oversteering) toy!
I find too many people have become too comfortable with relying only on numbers or CAD models without understanding what’s actually happening. Our empirical approach takes time (in terms of putting your hands on your vehicle to gather data then entering that data into a spreadsheet) but anything worth doing well is worth investing time in. What you learn with your hands AND mind sinks in deeper than just reading about it. There’s no fancy 3D model I know of (and that includes what automakers themselves have) that can show you all the subtle interactions taking place. The designer of our FCM bump stops even told me that he is often called in for final vehicle evaluation from Big 3 automakers to give feedback before they approve final production specs. His feedback comes literally from the seat of his pants! I’ll be sharing much more in upcoming blog posts and videos about our own ‘common sense’ tuning approach so you can apply it yourself for excellent Real World results.
Optimizing compression and rebound force plus lowering gas pressure to make our FCM Elite monotube builds even smoother and with better hysteresis than twin tubes

During our initial FCM Elite build, we optimize the compression and rebound force produced by the monotube Bilstein damper. We set the nitrogen gas pressure based on the amount of compression force we need to generate. The only purpose for the nitrogen pressure in these monotube dampers is to support the oil column. The gas pressure prevents the shaft+piston movement from ‘collapsing’ the nitrogen column (located at the bottom of the damper body):
This collapse or ‘softening’ of initial force (for a monotube damper) is seen on a dyno graph as ‘hysteresis’ and only shows up in a CVP or low-speed full loop PVP shock dyno plot, not the typical average Force vs. Velocity dyno plot you usually see. Sometimes it’s easier to hide things than to explain them, or prevent them from happening…


I explain how to interpret the shock dyno graph (the typical Force vs. Velocity graph which is usually shown) in this video and it would help you visualize how the damper is moving and where the hysteresis is coming from. You can watch the whole video up to about 9 min to get a more thorough overview:
Any difference in forces when at the top of the stroke vs. the bottom of the stroke means the damper is not managing internal pressure well. That imbalance is a function of its construction and valve design. It takes effort to pressure balance a damper and high-end racing damper builders focus on achieving this. So for a typical inexpensive twin tube damper that is weak in compression, this imbalance at both ‘zero velocity points’ leads to inconsistent damper performance and a vague response which you feel behind the wheel and through the tire’s inconsistent grip.
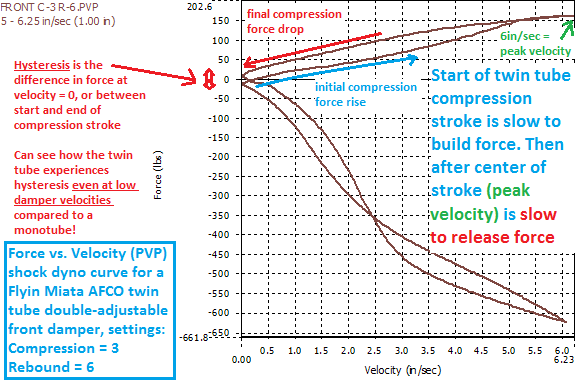
I found a few additional images showing hysteresis. The first is from a graph provided by Keith Tanner of Flyin Miata (but later removed from public display) of the AFCO twin tube double adjustable suspension they used to sell.
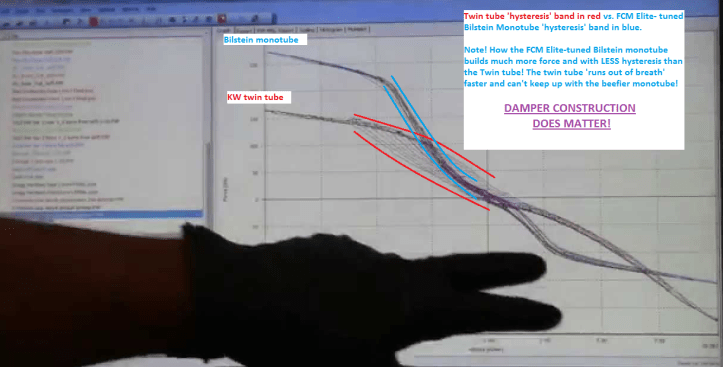
The second hysteresis image is the ‘non-folded’ Force vs. Velocity graph of a new KW twin tube (settings as received) vs. an FCM Elite-tuned Bilstein for an BMW E36 M3. The video I took it from is linked here. I prefer to view the shock forces in this non-folded format since you can visualize the damper’s behavior as it crosses between rebound and compression (and it shows ‘jerk’ or sharp changes in the curve much more clearly than the graph display above). It’s very clear how the Bilstein has a much tighter ‘hysteresis band’ vs. the twin tube KW’s wider band and more deficient, less precise damping. The knobs don’t “fix” hysteresis, either!
While there are some very specific situations when you may design for asymmetric behavior you would generally be better off starting with MORE compression force than less. When there is less resisting force during initial compression movement, the damper does not compensate quickly enough for suspension motions. The damper lags behind road inputs: hysteresis is also called ‘phase delay’ or ‘phase lag’. The damper with too-soft initial compression force isn’t providing enough force for the suspension to manage the road without losing composure, so the driver isn’t feeling confident in controlling the vehicle, whether in a straight line or in a turn. An analogy for why hysteresis is bad is not getting the punch line to a joke’s – then YOU become the joke!
Unlike a rebuildable monotube, where you can change valve profile and other variables to control hysteresis, most twin tubes are non-rebuildable. Or if they’re rebuildable, they’re only serviceable by a limited few who are in love with LOTS of rebound and don’t recognize there’s a problem to begin with(!). Twin tubes are cheaper for a reason and yes Mr. Dennis Grants of Far North Racing, construction DOES matter!
A typical twin tube damper suffers from hysteresis because its internal design and choice of foot and main piston valves plus shaft diameter combine to prevent rapid generation of compression force as well as sufficiently rapid release once that pressure has built up. So you get 1) a slow ramping up which makes twin tubes much more prone to bottoming out, along with 2) a delayed release in that pressure when you need to transition into the rebound stroke. This creates a double-whammy of both bottoming out during the initial phase of encountering a bump plus potential upward ‘launching’ from too much compression force when cresting the top of that same bump. Frustrating, right?!
This video goes into details of behaviors visible in the shock dyno graph for KW twin tube dampers. They use twin-tubes (based on the Koni Sport design) for much of their entry-level aftermarket suspension (Variant 1, Variant 2, and Variant 3).
Dealing with a ‘phase lagged’ or hysteresis-prone damper is a very annoying experience simply driving your regular roads. You know something is off but can’t quite put your finger on what. For a high-performance enthusiast or in a competition environment, it leads to a lack of confidence and grip. As Jerry Jenkins describes in this video at 2009 Solo Nationals (after he won with our FCM Elite setup), you end up ‘smacking the bump stops’ in transitions with twin tubes since they are slower to respond than a monotube.
“I wasn’t smacking bump stops either (like when I used Koni Sport twin tubes)” – Jerry Jenkins, two-time SCCA E Street National Champion with FCM Elite monotube Bilsteins, in 2008 and 2009. The Koni Sport dampers had insufficient compression force to control the initial downward movement, instead relying on too much rebound to attempt to ‘lock’ the chassis down, so the car would effectively bounce off the bump stops between each transition!
A few more videos about Monotube vs. Twin Tube dampers below:
Control and Smoothness – the beauty of the Bilstein monotube design for control and durability combined with FCM Ripple Reducer which allow lower gas pressure for reduced ‘stiction’ and better compliance on rough roads
Since we now see how the monotube is a superior design – provided it’s optimized correctly – the tricky part is getting just enough gas pressure to prevent that nitrogen gas chamber from collapsing but using so much gas pressure that you create excess ‘stiction’ (i.e. resistance to initial compression motion). This is indeed a delicate balance but a vitally important relationship to understand and pay attention to.
It was just a few years ago I grokked the impact of gas pressure, including how much to use and why – and later discovering ways to reduce it (via Ripple Reducer!). I have noted that in the past few years, more Bilstein dampers have come with lower gas pressure from the factory, but this isn’t true across the board. So far I’ve never seen a production Bilstein that has holes drilled in it but who knows, maybe one day, right?!
You can’t just ‘subtract’ the gas force from a shock dyno graph and pretend it’s not there in the Real World!
Some people might say ‘so what, gas pressure is just like spring preload! It helps add some spring rate and helps push the inside shock down in a corner which helps grip! Hey, even Jan who started JRZ is a fan of lots of gas pressure and says it does great things! Why the big stink?’Well my friend, let me tell you why…
Yes, people would like to make a simple analogy of nitrogen gas pressure in a damper being just like ‘preloading a spring,’ whether by turning the spring perch collar up, or inserting a spacer between the spring and the spring perch. While it’s true that preloading the spring affects the vehicle’s ride height, spring preload does NOT affect the damper’s behavior in any way. This should be obvious without needing more explanation – they are totally separate devices.
However, preloading the damper via INCREASING the internal gas pressure has TWO effects. Its both increases the ride height (like preloading the spring) AND increases ‘stiction’, in that the added gas pressure makes the damper more stiff in compression as well as less stiff in rebound. The entire damping curve is shifted upward by the effect of gas pressure which is like adding a spring internal to the damper itself. This is a critically important difference to understand, because preloading a spring and adding pressure to a damper are VERY DIFFERENT and do not have the exact same affect!
Why? You have to overcome this ‘gas spring’ force inside the damper before the fluid starts to flow through the hydraulic piston. The force from this gas spring is clearly felt as a general ‘stiffness’ or ‘harshness’ to the suspension’s initial response. The tires also feel this this added gas spring and are being ‘shocked’, not tracking the road. Behind the wheel, the difference is tangible as anyone who has gone from a lower-pressure twin tube (roughly 50-80 psi) to a higher-pressure monotube (often over 300 psi) can attest. I’ve heard countless times “I installed Bilsteins and they were really rough compared to the XYZ twin tubes I had in there.” This is why we always have to optimize the Bilsteins for our customers and off-the-shelf they almost never get the job done.
The gas spring (often 40, 50, 60 or more pounds of force) pushing upward on the damper shaft is why some people complain that higher pressurized monotube are stiffer even if the (subtracted!) dyno graphs may look similar to a twin tube. Those dyno graphs are ‘zeroing’ or remove the gas pressure. While looking at subtracted graphs is useful when developing valving, you always have to remember it’s STILL there! Boy howdy you can feel it in the Real World!
Compare these next three images to see directly how you can be misled into thinking the damper would ‘feel’ a certain way if gas force is numerically subtracted but is still present when on the vehicle.


I made the video below in early 2016 after completing an FCM Elite build for a Scion FR-S owner. You can see the Force vs. Velocity curves for the factory twin tube dampers, an off-the-shelf Bilstein PSS monotube (with high pressure), and then the FCM Elite-retuned Bilstein PSS (with much lower gas pressure, KBO, and Ripple Reducer added). The FR-S has same suspension design as the Subaru BRZ – they’re both of Toyota’s FT86 platform and are often called ‘the twins’.
You can see me uncheck the ‘G’ or ‘Gas Force’ box on the Roehrig software and how how the gas pressure ‘lifts’ the entire curve upward. That initial ‘cracking force’ at 0 in / sec velocity suddenly becomes non-zero! That force has to be overcome before the damper actually starts moving (starting after 11 min 55 seconds in):
Creating a High Frequency piston to improve road compliance and also allow lower nitrogen charge pressure
So having gone deeply into the theory and practice of gas pressure, hysteresis, and how to minimize them, we bring in another element that plays strongly into the role of Elite builds. When I first noticed the Ohlins has a High Frequency piston and started modifying our Bilstein digressive pistons to introduce small holes we got better grip and ride quality. The small holes allow flow at very low displacement and speeds but effectively ‘choke’ at higher displacements. I call it Ripple Reducer and there are several video about it and if you’re interested, you can start with our 1999 Mazda Miata customer Tom’s testimonial.
I already mentioned above but using those small holes had the unexpected but understandable benefit of allowing a lower nitrogen gas pressure, which means less ‘stiction’ as well as superior grip and ride especially on rougher roads. These elements of gas pressure optimization connected to a high frequency piston and use of our KBO technological are major advantages of our Elite process.
Changing the way a damper handles larger amplitude compression events – or ‘Smart Shocks’ without the complicated sensors, wires, and expensive repair costs!
The highlight of the Kelley’s FCM Elite build for their ND Miata is intregration of our ground-breaking KBO v1.9 (Kerb Blow-Off) technology, which is specific to the Bilstein monotube damper. It’s been the focus of more than three years of constant research & development, customer feedback, and incremental improvements. KBO works by relieving pressure on large amplitude hits by ‘blowing open’ the KBO compression valve which responds very quickly to prepare for the next compression event. It’s an efficient, elegant, and durable system that dramatically reduces the impact of road imperfections while also allowing us to use more low speed compression for body control without having to rely on rebound (as the majority of racing dampers do).
After the build is completed, it would be left for them test and give me feedback on the handling so we could collaborate on any changes to sway bar settings, bump stop lengths, adding packers (part 1 and part 2) to adjust understeer/oversteer, etc.
Thankfully, the front damping seem to be working very well so nothing needed to be changed there as of yet. Understeer was still the natural state of the vehicle but this wasn’t surprising since even production rear-wheel drive sport cars were made to gain negative camber faster at the rear than the front to keep the cars fro spinning out. We had also further increased the front sway bar stiffness in an effort to use all available tools for increasing roll stiffness since the main springs have to remain unchanged for Street class autocross. With this increased front sway bar size, we could compensate with alignment, bump stops, and damping to minimize the resulting understeer.
However, keep in mind that these dampers did not come with knobs nor did we add them after the fact! This is why our characterization process and my experience with suspension damping are important to getting a great baseline damping recipe so, as Deana herself said:
“It’s been a crazy year. I definitely got a lot of seat time in the car which was a huge amount of help. It’s been really awesome to just focus on my driving and let the car do its thing and every turns out great!” – Deana Kelley, 2016 SCCA C Street Ladies National Champion and FCM Elite KBO / Ripple Reducer customer
Without knobs, there was no need to worry about a frozen or broken adjusters (as Travis said he experienced working with a frozen JRZ rear damping adjuster that sprayed him in the face!). It takes research on my part and trust on our racer’s part, especially for a competition setup, to avoid ‘Playing with Knobs.’ But the upside is you have a well-thought-out suspension you can also trust, meaning you’re free to ‘Just Go Drive’ as Deana says (she did win a Championship in strong fashion, after all!):
What needs to be done for 2017? Not much really, but it’ll help make them faster …
Again, since we’ve done so much to get the original Elite build well-dialed, it turned out we are going to just make some improvements to the rear dampers. What are those? We’ll now be using Ripple Reducer v1.1, which means we’ll start with new Bilstein ‘COB’ digressive pistons and will drill more and smaller bleed holes than v1.0. While Deana has been out racing and winning, we’ve developed other applications this year. In particular, from experience with a BMW E46 M3, Mercedes AMG E55, Mitsubishi EVO VIII, Ford Fiesta ST, S197 Ford Mustang GT and several other Mazda Miatas, this new Ripple Reducer v1.1 recipe of “smaller holes and more of ’em” encourages the damper to open even earlier which reduces stiction and improves traction. Any friction in the damper system has consequences for both ride and grip so efforts to smooth out the damper pay big dividends! I have a separate blog post indicating changes between RR v1.0 and RR v1.1 to stay tuned!
Putting it all together – with feedback from other racers
The work we do at Fat Cat Motorsports in optimizing damping takes a fair bit of information and also driving feedback from our customers. I have to thank both Malcolm K. and Jeffrey Bandes Through conversations with them on impressions for our first version ND valving, I knew where we can further improve for the Kelley’s 2017 C Street recipe. Interesting, I went against my intuition to create a more ‘rebound-biased’ setup for the first version, thinking the ‘softer’ rebound might be too soft. I was WRONG! I should have listened to my OWN experience and intuition! None of our fastest setups jack down, and that included the competition ones. I won’t need to make that ‘mistake’ again!
It’s this cooperation between me and my customers that I love so much. There are some competitors who are willing to share details of their setups to advance the sport and this seems more prevalent in autocross than anywhere else. Being brought up as an autocrosser first then a track guy second, I still feel that spirit of sharing though I have to budget my time since we have so much going on. Still, I want to work with good-hearted people who are serious about getting results and willing to buy the best technology I can provide. This is my intention moving into 2017 to be even more committed to only working with the best people to give them the best results.
You wanna visit Fat Cat? Get ready to work!
Being the hands-on fellow that I am (and figuring who wouldn’t want a chance to play with some dampers especially their own!), I suggested they take their rear Bilsteins apart…


I mean, I could point to shock dyno graphs (ho hum!) and talk more about rebound and jacking down but I’ve covered that and they were HERE! So let’s make it fun! I didn’t videotape the operation (which Travis was surprised at – heh!) but they followed all the steps necessary to get their damper bodies apart and ready for revalving. In writing this blog post and also sharing the experience with Deana and Travis, I’ve intended to give a more hands-on feel to what’s going on inside so how a damper works seems less of a ‘black art.’
After our visit they were back on the road to meet up with their family. I’ve enjoyed a peaceful and rejuvenating Christmas weekend. I’m excited to finish 2016 in style before ringing in a New Year with much more to share through blogs, instructional videos, and user-friendly suspension spreadsheets you can play with on your own!
Have a safe and merry holiday season and a great start to 2017!

I would like to thank you for the efforts you’ve put in writing this blog. I’m hoping to check out the same high-grade content from you later on as well. In truth, your creative writing abilities has inspired me to get my own website now 😉
LikeLike